在 CentOS 6.2 上安装 Cobbler
2012年03月13日 | 标签: centos, cobbler, pxe | 作者:vpsee
每次給自己的电脑重装系统都是一件很无聊的事情,如果需要重装上百台虚拟机和服务器不但很无聊而且很耗时,面对现在云时代大量服务器和虚拟机的出现,运维必须要自动化。现在有很多开源工具可以帮助我们实现自动化安装系统,比如 FAI, Cobbler, Spacewalk, Ubuntu Orchestra 等,我们打算把 Cobbler 安装在某台虚拟机上,为我们新购的16台刀片服务器自动安装系统。
Cobbler 是一个系统启动服务(boot server),可以通过网络启动(PXE)的方式用来快速安装、重装物理服务器和虚拟机,支持安装不同的 Linux 发行版和 Windows. Cobbler 是个轻量级 Python 程序,总共大概1.5万行代码,还可以用来管理 DHCP, DNS, yum 源等。Cobbler 使用命令行方式管理,也提供了基于 Web 的界面管理工具(cobbler-web),不过命令行方式已经很方便,实在没有必要为了不实用的 Web 界面再添加一个 Web 服务器。
修改 DHCP 服务器配置
使用 Cobbler 最好配合现有局域网上的 DHCP 服务器一起使用,这样不会因为 Cobbler 干扰现有局域网。我们不打算用 Cobbler 来管理整个网络的 DHCP,因为我们已经有了 DHCP 服务器,所以只要在现有的 DHCP 服务器上做以下配置即可,下面记得调整 192.168.2.22 这个 IP 地址指向 Cobbler 服务器:
# for Cobbler setup
host cobbler {
    option host-name "cobbler";
    ddns-hostname "cobbler";
    hardware ethernet 00:0c:29:2d:2c:39; #MAC address of cobbler server
            fixed-address 192.168.2.22; #IP of Cobbler server
            allow booting;
    allow bootp;
    class "PXE" {
        match if substring(option vendor-class-identifier, 0, 9) = "PXEClient";
        next-server 192.168.2.22; #IP of Cobbler server
            filename "pxelinux.0";
    }
}
安装和配置 Cobbler
Cobbler 不在 CentOS 6.2 的基本源中,需要导入 EPEL 源:
# rpm -Uvh http://dl.fedoraproject.org/pub/epel/6/x86_64/epel-release-6-5.noarch.rpm
Retrieving http://dl.fedoraproject.org/pub/epel/6/x86_64/epel-release-6-5.noarch.rpm
warning: /var/tmp/rpm-tmp.lo2Hd0: Header V3 RSA/SHA256 Signature, key ID 0608b895: NOKEY
Preparing...                ########################################### [100%]
   1:epel-release           ########################################### [100%]

# yum update
# yum upgrade
安装 cobbler:
# yum install cobbler
修改配置,主要修改 cobbler 服务器所在的 IP 地址:
# vi /etc/cobbler/settings
...
next_server: 192.168.2.22 #IP of Cobbler server
server: 192.168.2.22 #IP of Cobbler server
...
启用 httpd, xinetd 和 cobbler 服务并确认已经加到系统自动启动服务中:
# /etc/init.d/httpd start
# /etc/init.d/xinetd start
# /etc/init.d/cobblerd start

# chkconfig httpd on
# chkconfig xinetd on
# chkconfig cobblerd on
修改 rsync 和 tftp 这两个服务的 xinetd 配置:
# vi /etc/xinetd.d/rsync
service rsync
{
        disable = no
...
}

# vi /etc/xinetd.d/tftp
service tftp
{
        ...
        disable = no
        ...
}
关闭防火墙和 SELinux 后重启系统:
# /etc/init.d/iptables stop
# chkconfig iptables off

# vi /etc/sysconfig/selinux
...
SELINUX=disabled
...

# reboot
检查和修改 Cobbler 配置
系统重启后用 cobbler check 检查发现3个配置信息问题,第一个是如果要部署 debian/ubuntu 系统需要 debmirror 软件包;第二个是需要修改 cobbler 的默认密码;第三个是可选,想使用电源管理功能的话需要安装 cman 或 fence-agents:
# cobbler get-loaders

# cobbler check
The following are potential configuration items that you may want to fix:

1 : debmirror package is not installed, it will be required to manage debian deployments and repositories
2 : The default password used by the sample templates for newly installed machines (default_password_crypted in /etc/cobbler/settings) is still set to 'cobbler' and should be changed, try: "openssl passwd -1 -salt 'random-phrase-here' 'your-password-here'" to generate new one
3 : fencing tools were not found, and are required to use the (optional) power management features. install cman or fence-agents to use them

Restart cobblerd and then run 'cobbler sync' to apply changes.
现在来修复上面三个问题,我们希望能让这台 cobbler 服务器能同时部署 CentOS/Fedora 和 Debian/Ubuntu 系统,所以需要安装 debmirror,安装 debmirror-20090807-1.el5.noarch.rpm 前需要先安装依赖包:
# yum install wget
# yum install ed patch perl perl-Compress-Zlib perl-Cwd perl-Digest-MD5 \
perl-Digest-SHA1 perl-LockFile-Simple perl-libwww-perl

# wget ftp://fr2.rpmfind.net/linux/epel/5/ppc/debmirror-20090807-1.el5.noarch.rpm

# rpm -ivh debmirror-20090807-1.el5.noarch.rpm
修改 /etc/debmirror.conf 配置文件,注释掉 @dists 和 @arches 两行:
# vi /etc/debmirror.conf
...
#@dists="sid";
@sections="main,main/debian-installer,contrib,non-free";
#@arches="i386";
...
用 openssl 生成一串密码后加入到 cobbler 的配置文件(/etc/cobbler/settings)里,替换 default_password_crypted 字段:
# openssl passwd -1 -salt 'www.vpsee.com' 'vpsee'
$1$www.vpsee$T5FgCHY2P0NDr6JmbN0Bl0

# vi /etc/cobbler/settings
default_password_crypted: "$1$www.vpsee$T5FgCHY2P0NDr6JmbN0Bl0"
安装 cman:
# yum install cman
修复完成,再用 cobbler check 检查一下,确认没问题后用 cobbler sync 做同步操作:
# cobbler check
No configuration problems found.  All systems go.

# cobbler sync
导入 ISO
挂载 CentOS-6.2-x86_64-bin-DVD1.iso 安装光盘然后导入到 cobbler(注意这个 iso 文件有 4GB 多,导入可能需要一段时间),导入成功后 cobbler list 查看一下:
# mount -o loop -t iso9660 CentOS-6.2-x86_64-bin-DVD1.iso /mnt

# cobbler import --path=/mnt --name=CentOS-6.2-x86_64-bin-DVD1 –arch=x86_64

# cobbler sync

# cobbler list
distros:
   CentOS-6.2-bin-DVD1-x86_64

profiles:
   CentOS-6.2-bin-DVD1-x86_64

systems:

repos:

images:
测试
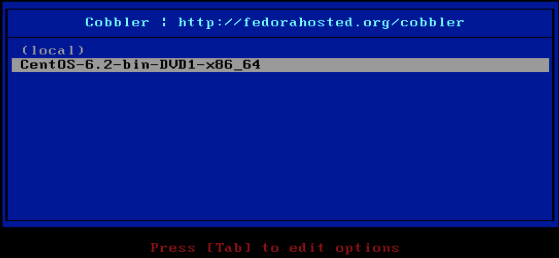
最后创建一台虚拟机测试一下,把虚拟机设置成网络 PXE 启动(和 cobbler 在同一个网络),启动后就可以看到 Cobbler 引导界面,看到界面后选择 CentOS-6.2-bin-DVD1-x86_64 条目就可以顺利开始无人工干预安装系统,Cobbler 引导界面如下:
安装完系统后默认的密码是啥呢?根据 sample.ks 的配置提示,这个密码 $default_password_crypted 就是我们上面用 openssl passwd -1 -salt ‘www.vpsee.com’ ‘vpsee’ 生成的密码,所以这里的 root 密码是 vpsee:
# cat /var/lib/cobbler/kickstarts/sample.ks
...
#Root password
rootpw --iscrypted $default_password_crypted
有啥办法把Centos 6.2 的DVD2也导入进去,研究了半天,也没找到办法。
您好,请教下。我在fedora15里装了kvm,为什么命令行kvm显示command not found?是不是要配置环境变量,请问如何配置?
@陈沙克
导入进去的 iso 其实都是在 /var/www/cobbler/ks_mirror/ 目录下面,直接把 DVD2 的内容拷贝到 /var/www/cobbler/ks_mirror/CentOS-6.2-x86_64-bin-DVD1/ 的相关目录里就可以。
这个再融合puppet, koan 加上 zabbix 的监控。写些接口,管理起来还是十分方便的
对于正在安装的系统,不知道在cobbler端是否能查看安装的进度或状态
@silverwave
貌似 cobbler 端看不到进度。
可以记录状态的。
# by default, installs are *not* set to send installation logs to the cobbler
# # # server. With ‘anamon_enabled’, kickstart templates may use the pre_anamon
# # # snippet to allow remote live monitoring of their installations from the
# # # cobbler server. Installation logs will be stored under
# # # /var/log/cobbler/anamon/. NOTE: This does allow an xmlrpc call to send logs
# # # to this directory, without authentication, so enable only if you are
# # # ok with this limitation.
anamon_enabled: 0
cobbler的默认kickstart配置有很多关联变量,对于我们自己如何定制kickstart文件能让cobbler去识别?
请问大神:
cobbler check
One or more repos need to be processed by cobbler reposync for the first time before kickstarting against them: precise-x86_64, precise-i386, precise-i386-security, precise-x86_64-security
如何修复?
有啥办法把Centos 6.2 的DVD2也导入进去,研究了半天,也没找到办法。
可以把DVD2的Package导入DVD1,重新制作镜像,然后再将该镜像导入;
请问博主:最后安装系统那步怎样设置为默认安装centos,而不是local?
@grant
试一下编辑那个菜单 /etc/cobbler/pxe/pxedefault.template
回复11楼
修改这个就可以更改默认启动项了
vim /var/lib/tftpboot/pxelinux.cfg/default
#cobbler check
中有一项是3 : please create directory: -v
请问大家是否有遇到这个修复?如何修复?
感谢各位回复,我把local的都注释掉了,但开始的蓝色界面没了,直接就开装centos,不过这不是个大问题,我现在有个更棘手的问题,老大需要cobbler能自动化安装windows系统,不知道各位有没有成功的?
@grant
没有试过,不过可以看看 https://github.com/cobbler/cobbler/wiki/Microsoft%20Systems%20Center 或者另外一套系统 http://www.opsi.org/en
@esky
cobbler reposync执行一次之后就没有这个提示了
请问针对您的环境,安装时间上怎样呢?
@vpsee
cobbler批量安装50台机器,或者100台机器的时间怎么估算?大概要多长时间?
请问我想批量安装多台机器,我把/var/lib/tftpboot/pxelinux.cfg/default这个文件里面的ONTIMEOUT 改成我的镜像,启动菜单超时后就会从我的镜像安装,但是安装完成之后又重复安装,settings里的pxe_just_once: 1 我已经设置为1了,有解决方法吗?
我已经安装了epel 为什么还是不能yum -y install cobbler