在 Linux 的 KVM 上安装 Mac OS X Mavericks 虚拟机
2014年06月6日 | 标签: kvm, mac os x | 作者:vpsee
现在我们很方便就能在 Mac 上通过 VirtualBox 安装 Mac OS X 虚拟机,如果没 Mac 的话也能很容易在 Linux/Windows 下通过 VirtualBox 体验 Mac,甚至把 Mac OS X 直接装在 PC 上也是可能的。如果想在数据中心这种 KVM/Xen 虚拟环境里安装 Mac OS X 呢?通过 Apple Remote Desktop 连接 n 个 Mac 虚拟机,应该会比较好玩吧。
以下操作在 CentOS 6.5 上测试通过。更详细的资料请参考 Running Mac OS X as a QEMU/KVM Guest.
首先需要 Linux 3.x 以上的内核,CentOS 6.5 上默认是 2.6.x 内核,所以需要另装或升级内核,我们这里用 CentOS 官方 Xen 源(Xen4CentOS6)里面的最新 Linux 内核,注意这里用的是源里的普通内核,不是要用 Xen 内核,你也可以用其他第三方源的内核或者自己下载内核编译。注意修改 grub.conf 文件的 default=0 部分确认系统启动后启动的是普通内核(不是启动 Xen 内核):
# yum install centos-release-xen
# yum update

# vi /etc/grub.conf
...
default=0
...

# reboot
当前的主流 Linux 发行版自带的 kvm/qemu 都不支持 OS X 作为 guest 系统,所以我们需要自己编译 kvm, kvm-kmod, qemu 加上 OS X 的支持。下载 kvm 和 kvm-kmod 源代码后编译,编译会出错,解决办法见后面:
# yum install git
# yum groupinstall 'Development Tools'

# git clone git://git.kernel.org/pub/scm/virt/kvm/kvm.git
# git clone git://git.kiszka.org/kvm-kmod.git
# cd kvm-kmod
# ./configure
# make LINUX=../kvm clean sync all
...
/root/kvm-kmod/x86/assigned-dev.c: In function ‘assigned_device_enable_host_msix’:
/root/kvm-kmod/x86/assigned-dev.c:434:2: error: implicit declaration of function ‘pci_enable_msix_exact’ [-Werror=implicit-function-declaration]
  r = pci_enable_msix_exact(dev->dev,
  ^
cc1: some warnings being treated as errors
make[3]: *** [/root/kvm-kmod/x86/assigned-dev.o] Error 1
make[2]: *** [/root/kvm-kmod/x86] Error 2
make[1]: *** [_module_/root/kvm-kmod] Error 2
make[1]: Leaving directory `/usr/src/kernels/3.10.34-11.el6.centos.alt.x86_64'
make: *** [all] Error 2
修改 assigned-dev.c 这个文件的第434行,用 pci_enable_msix 函数替代 pci_enable_msix_exact,查看 git 修改记录和日志,貌似 pci_enable_msix_exact 是 Linus 上个月刚加上去的,我们这里还原,还是用原先的 pci_enable_msix 就可以了。
# vi /root/kvm-kmod/x86/assigned-dev.c
...
        /*r = pci_enable_msix_exact(dev->dev,
                                  dev->host_msix_entries, dev->entries_nr);*/
        r = pci_enable_msix(dev->dev, dev->host_msix_entries, dev->entries_nr);
...
修改代码后重新编译,注意这时候 make clean all 不要 sync,否则上面的修改会被重新覆盖:
# make LINUX=../kvm clean all
编译成功后,就可以加载 kvm-intel 内核了,使用 dmesg 确认内核加载成功:
# modprobe -r kvm_intel
# cp ./x86/kvm*.ko /lib/modules/$(uname -r)/kernel/arch/x86/kvm/
# modprobe kvm_intel

# dmesg | tail -n1
loaded kvm module (for-linus-40872-ga4e91d0)
kvm 部分告一段落,现在来编译 qemu:
# yum install zlib zlib-devel glib2-devel pixman-devel

# cd
# mkdir osx

# git clone git://git.qemu.org/qemu.git
# cd qemu
# ./configure --prefix=/root/osx --target-list=x86_64-softmmu
# make clean; make; make install
我们要安装 OS X 当然需要 OS X 的启动盘。到 App Store 里下载 Install OS X Mavericks.app 安装文件,然后在 Mac 上用下面的脚本生成一个可启动的 Mavericks ISO 文件,我们将要用这个 Mavericks.iso 安装系统,所以我们还需要把这个 Mavericks.iso 拷贝到 KVM 服务器上 :
$ vi createiso.sh
# Mount the installer image
hdiutil attach /Applications/Install\ OS\ X\ Mavericks.app/Contents/SharedSupport/InstallESD.dmg -noverify -nobrowse -mountpoint /Volumes/install_app

# Convert the boot image to a sparse bundle
hdiutil convert /Volumes/install_app/BaseSystem.dmg -format UDSP -o /tmp/Mavericks

# Increase the sparse bundle capacity to accommodate the packages
hdiutil resize -size 8g /tmp/Mavericks.sparseimage

# Mount the sparse bundle for package addition
hdiutil attach /tmp/Mavericks.sparseimage -noverify -nobrowse -mountpoint /Volumes/install_build

# Remove Package link and replace with actual files
rm /Volumes/install_build/System/Installation/Packages
cp -rp /Volumes/install_app/Packages /Volumes/install_build/System/Installation/

# Unmount the installer image
hdiutil detach /Volumes/install_app

# Unmount the sparse bundle
hdiutil detach /Volumes/install_build

# Resize the partition in the sparse bundle to remove any free space
hdiutil resize -size `hdiutil resize -limits /tmp/Mavericks.sparseimage | tail -n 1 | awk '{ print $1 }'`b /tmp/Mavericks.sparseimage

# Convert the sparse bundle to ISO/CD master
hdiutil convert /tmp/Mavericks.sparseimage -format UDTO -o /tmp/Mavericks

# Remove the sparse bundle
rm /tmp/Mavericks.sparseimage

# Rename the ISO and move it to the desktop
mv /tmp/Mavericks.cdr ~/Desktop/Mavericks.iso

$ sudo sh createiso.sh
在 Mac 上编译 smc_read.c 这个文件并运行得到 SMC,这个 SMC 序号我们会在后面用到:
$ vi smc_read.c /* * smc_read.c: Written for Mac OS X 10.5. Compile as follows: * * gcc -Wall -o smc_read smc_read.c -framework IOKit */ #include#include typedef struct { uint32_t key; uint8_t __d0[22]; uint32_t datasize; uint8_t __d1[10]; uint8_t cmd; uint32_t __d2; uint8_t data[32]; } AppleSMCBuffer_t; int main(void) { io_service_t service = IOServiceGetMatchingService(kIOMasterPortDefault, IOServiceMatching("AppleSMC")); if (!service) return -1; io_connect_t port = (io_connect_t)0; kern_return_t kr = IOServiceOpen(service, mach_task_self(), 0, &port); IOObjectRelease(service); if (kr != kIOReturnSuccess) return kr; AppleSMCBuffer_t inputStruct = { 'OSK0', {0}, 32, {0}, 5, }, outputStruct; size_t outputStructCnt = sizeof(outputStruct); kr = IOConnectCallStructMethod((mach_port_t)port, (uint32_t)2, (const void*)&inputStruct, sizeof(inputStruct), (void*)&outputStruct, &outputStructCnt); if (kr != kIOReturnSuccess) return kr; int i = 0; for (i = 0; i < 32; i++) printf("%c", outputStruct.data[i]); inputStruct.key = 'OSK1'; kr = IOConnectCallStructMethod((mach_port_t)port, (uint32_t)2, (const void*)&inputStruct, sizeof(inputStruct), (void*)&outputStruct, &outputStructCnt); if (kr == kIOReturnSuccess) for (i = 0; i < 32; i++) printf("%c", outputStruct.data[i]); printf("\n"); return IOServiceClose(port); } $ gcc -Wall -o smc_read smc_read.c -framework IOKit $ ./smc_read REPLACE-YOUR-KEY-HERE(c)AppleComputerInc
快搞定了,最后我们还需要一个硬盘文件来充当虚拟机的硬盘以及 chameleon_svn2360_boot 这个文件,Chameleon 是 Darwin/XNU 系统的启动器(boot loader),用来在非苹果硬件上启动 OS X:
# /root/osx/bin/qemu-img create -f qcow2 osx.img 20G

# wget http://www.contrib.andrew.cmu.edu/~somlo/OSXKVM/chameleon_svn2360_boot
在 KVM 上启动安装这个我们准备已久的 OS X Mavericks 虚拟机吧,注意下面的 osk="REPLACE-YOUR-KEY-HERE(c)AppleComputerInc" 部分用上面的 SMC 序号替代:
# /root/osx/bin/qemu-system-x86_64 -enable-kvm -m 2048 -cpu core2duo \
-smp 2 \
-vga std \
-device ahci,id=ide \
-usbdevice keyboard -usbdevice mouse \
-device isa-applesmc,osk="REPLACE-YOUR-KEY-HERE(c)AppleComputerInc" \
-kernel /root/chameleon_svn2360_boot \
-smbios type=2 \
-device ide-drive,bus=ide.2,drive=MacHDD \
-drive id=MacHDD,if=none,cache=none,file=/root/osx.img \
-vnc 0.0.0.0:1 \
-device ide-drive,bus=ide.0,drive=MacDVD \
-drive id=MacDVD,if=none,snapshot=on,file=/root/Mavericks.iso -boot once=d
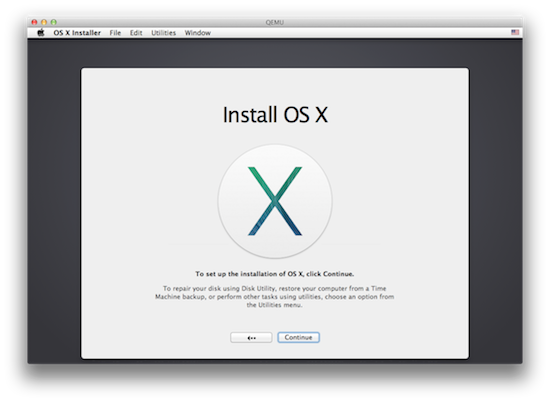
打开 VNC 客户端连接上面 KVM 服务器 IP 和端口 5901 就会看到安装界面了,先按回车开始安装,然后用菜单里的 Disk Utility 工具分区,退出 Disk Utility 就可以看到安装盘了,点击安装盘后就可以看到 Install OS X 安装界面了:
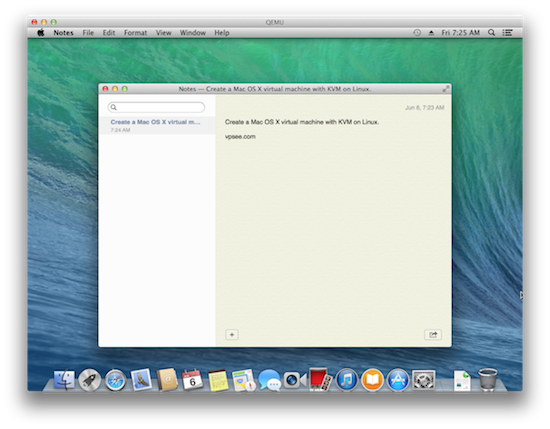
安装完后会重启进入系统:
性能如何?或者说可用性如何~~~或者说硬件要求咋样?
性能不错,可能是刚安装的干净系统,只配了 2G 的内存就运行得很流畅~
硬件没啥要求,母机的 CPU 支持虚拟化(KVM)就行。
好吧!没有MAC的想学就好悲催了好伐!
迫不及待的想去试试,最好把安装文件都找个网盘放一下,是不是我太懒了?哈哈
^_^最近在学习KVM,刚好试试不知能否提供mac.iso, 最好不过了.
@lmy
只有 mac.iso 是不够的,需要一台 Mac 上的 SMC 序号,当然貌似有办法用假 SMS 序号绕过去,不过很麻烦~
能问一下kvm下的osx跟 virtualbox下的性能比较吗, 简单的对比.
哈哈,只有继续屌si的日子吧
我这几天一直在照着这篇文章做,但是做到最后发现并不行啊,我是在ubuntu下做的。是不是我的iso不干净啊?
求一个纯净的ISO镜像链接@vpsee
@Kermit
最重要的是那个 “SMC 序号”,你需要有一台真实的 Mac 才能得到 “SMC 序号”。ISO 直接从苹果官方 App Store 下载,是免费的。
@vpsee
我只有一台windows电脑,SMC序列号已经有了,但是貌似我的电脑不能够在app store下载,我没有找到那个选项。不知有不有直接上传到网上的原版啊?
我在网上找了一个Install OS X Mountain Lion.app.rar的文件,然后解压,将Install OS X Mountain Lion.app\Contents\SharedSupport目录里面的InstallESD.dmg提取出来,使用软碟通转换成ISO的,不知对否?
@Kermit
应该可以吧~
(⊙o⊙)… 奔溃了~跟之前的一样,一直停在灰苹果那儿不动了~~ 博主能分享一下你的Mavericks.iso镜像吗?
@vpsee
能加我QQ么?我想跟你交流一下~
哥们,求助,价格可以谈
ourhardworkbythesewordsguardedpleasedontsteal SMC不对 得到的是这个 不知道为什么
自己制作一个yosemite.iso,通过vmware workstation安装成功,在KVM上面,通过vnc连接之后,全是刷屏,Read HFS+ …… ,不知道是否有遇到过的呢?如何解决?谢谢!
[root@dm01 kvm-kmod]# uname -r
3.5.0
[root@dm01 kvm-kmod]# ./configure
Error: kernel is too old for this kvm-kmod release.
这是什么原因呢?
按照你上面说的,修改 assigned-dev.c后,再make,报以下错误:
/root/kvm-kmod/x86/svm.c: In function ‘svm_set_cr4’:
/root/kvm-kmod/x86/svm.c:1625: error: implicit declaration of function ‘cr4_read_shadow’
make[3]: *** [/root/kvm-kmod/x86/svm.o] Error 1
make[2]: *** [/root/kvm-kmod/x86] Error 2
make[1]: *** [_module_/root/kvm-kmod] Error 2
make[1]: Leaving directory `/usr/src/kernels/3.10.68-11.el6.centos.alt.x86_64′
这是什么问题啊
Ubuntu15.10下,默认的linux kernel 4.2。qemu 2.3。
又手工安装了qemu 2.5。但是安装yomesite刚boot就报panic pthread kernel extension not loaded了。
请求有解决思路吗?谢谢。
Mavericks安装成功了。
担心性能的,可以考虑VGA passthrough
显卡可以用hd6570或hd7750
除了Snow Leopard我没成功, El Capitan, Yosemite, Mavericks, Mountain Lion, Lion都可以passthrough成功
声音可以用PulseAudio解决
鼠标键盘用Synergy即可
一直卡着,进不到GUI安装界面,然后我去掉:-device isa-applesmc,osk=”REPLACE-YOUR-KEY-HERE(c)AppleComputerInc” 就可以进入GUI安装界面并开始安装了。
但是我这样没输入这行的话,会影响使用吗?
一直卡在黑色那里,转转转的,进不了GUI安装界面,然后我把:-device isa-applesmc,osk=”REPLACE-YOUR-KEY-HERE(c)AppleComputerInc” \ 这行删掉,就可以进入安装界面并成功安装了。
但是这行删掉的话,对后面使用有影响吗?