Nginx: could not build the server_names_hash 解决办法

上周给一台 Nginx proxy 服务器增加一个虚拟主机名(server_name)后重启 nginx 报错,nginx -t 测试和查看 nginx 错误日志均发现需要增加 server_names_hash_bucket_size 的默认参数:

# /etc/init.d/nginx reload
 * Reloading nginx configuration nginx                                            [fail]

# nginx -t
nginx: [emerg] could not build the server_names_hash, you should increase either server_names_hash_max_size: 512 or server_names_hash_bucket_size: 64
nginx: configuration file /etc/nginx/nginx.conf test failed

# tail /var/log/nginx/error.log
2015/01/28 10:21:51 [emerg] 22362#0: could not build the server_names_hash, you should increase either server_names_hash_max_size: 512 or server_names_hash_bucket_size: 64

解决办法是在 nginx 配置文件的 http 段中增加如下配置:

# vi /etc/nginx/nginx.conf
...
http {
        ...
        server_names_hash_max_size 512;
        server_names_hash_bucket_size 128;
        ...
}
...

Nginx 官方文档关于 server_names_hash_max_size 和 server_names_hash_bucket_size 这两个参数的用法解释的很清楚。
在 FreeBSD 10.0 上安装和配置 Nginx+PHP+APC+MySQL

上月得知一位同事要退休,留下一些 BSD 机器需要接手(是的,在国外玩技术可以玩到退休~),接下来两个月讨论 FreeBSD/OpenBSD 的机会可能多一些。FreeBSD 10.0 发布的亮点不少,clang 替代了 gcc 成为默认编译器、大幅增强了对虚拟化的支持、下一代软件包管理工具 pkgng 替代了 pkg_add/pkg_delete 成为默认包管理工具、Linux 一直在虚拟化方面遥遥领先 BSD 阵营,这次的发行版本终于包括了 BSD 自己的虚拟化技术 bhyve,…

在 FreeBSD 下安装软件的传统方法是用 ports 源码安装,不过使用 ports 源码编译安装太耗时(尤其是各种库依赖多、大的时候),个人还是喜欢 pkg 这种软件包管理工具直接安装编译好的二进制软件包,不用自己编译,省时省力。

和 Linux 一样,FreeBSD 也能一行命令解决所有安装和软件包依赖问题(下面的输出要比 apt-get/yum 来的清新舒服吧~):

# pkg install nginx php55 php55-extensions pecl-APC mysql56-server
Updating repository catalogue
The following 23 packages will be installed:

	Installing nginx: 1.4.7,1
	Installing php5-session: 5.4.26
	Installing php5-xmlwriter: 5.4.26
	Installing php5-dom: 5.4.26
	Installing php5-xml: 5.4.26
	Installing php5-simplexml: 5.4.26
	Installing php5-ctype: 5.4.26
	Installing php5-posix: 5.4.26
	Installing php5-hash: 5.4.26
	Installing php5-filter: 5.4.26
	Installing php5-tokenizer: 5.4.26
	Installing php5-json: 5.4.26
	Installing php5-sqlite3: 5.4.26
	Installing php5-pdo: 5.4.26
	Installing php5-iconv: 5.4.26
	Installing php5-phar: 5.4.26
	Installing pecl-APC: 3.1.14_1
	Installing php5-xmlreader: 5.4.26
	Installing php5-pdo_sqlite: 5.4.26
	Installing php5-extensions: 1.7
	Installing mysql56-client: 5.6.16_1
	Installing mysql56-server: 5.6.16

The installation will require 149 MB more space

14 MB to be downloaded

Proceed with installing packages [y/N]: y

安装完后把服务加到系统启动文件里:

# vi /etc/rc.conf
...
nginx_enable="YES"
php_fpm_enable="YES"
mysql_enable="YES"

配置 MySQL:

# vi /usr/local/etc/my.cnf
[mysqld]
socket = /tmp/mysql.sock

skip-networking
skip-name-resolve

# service mysql-server start

# /usr/local/bin/mysqladmin -u root password 'password'

配置 PHP 和 PHP-FPM,这里不需要配啥,默认的配置就行:

# cp /usr/local/etc/php.ini-production /usr/local/etc/php.ini

# vi /usr/local/etc/php.ini
# vi /usr/local/etc/php-fpm.conf

# service php-fpm start

配置 APC:

# echo 'apc.enabled="1"' >> /usr/local/etc/php.ini
# echo 'apc.shm_size="32M"' >> /usr/local/etc/php.ini
# service php-fpm restart

配置 Nginx:

# vi /usr/local/etc/nginx/nginx.conf
user  www;
worker_processes  1;

events {
    worker_connections  1024;
}

http {
    include       mime.types;
    default_type  application/octet-stream;

    sendfile        on;
    keepalive_timeout  65;

    server {
        listen       80;
        server_name  localhost;

        location / {
            root   /usr/local/www/nginx;
            index  index.html index.htm;
        }

        # redirect server error pages to the static page /50x.html
        #
        error_page   500 502 503 504  /50x.html;
        location = /50x.html {
            root   /usr/local/www/nginx-dist;
        }

        # pass the PHP scripts to FastCGI server listening on 127.0.0.1:9000
        #
        location ~ \.php$ {
            root   /usr/local/www/nginx;
            fastcgi_pass   127.0.0.1:9000;
            fastcgi_index  index.php;
            fastcgi_param  SCRIPT_FILENAME  $document_root$fastcgi_script_name;
            include        fastcgi_params;
        }
    }
}

# service nginx start

写个 phpinfo() 页面测试一下 Nginx/PHP/PHP-FPM/APC 组合是否能正常工作。如果一切正常的话访问 http://localhost/info.php 能看到 PHP 环境详细信息:

# vi /usr/local/www/nginx/info.php
<?php phpinfo(); ?>

对 NetBSD 感兴趣的同学可以参考:NetBSD 上安装和配置 Nginx+PHP+FastCGI+MySQL

在 Ubuntu 上搭建 Ghost 博客平台

Ghost 是一款开源的博客平台,基于 Node.js,由前 WordPress UI 主管 John O’Nolan 和 WordPress 开发人员 Hannah Wolfe 创立。网上的开源博客程序众多,去年刚上线的 Ghost 来势汹汹正迅速捕获用户,0.4.1 这么早期的版本就让 Coding Horror 拥抱了 Ghost。Ghost 主题/模版越来越多,一些优秀的 WordPress 主题商,比如 WooThemes 都开始提供 Ghost 主题了

安装 Ghost 非常容易,甚至比 WordPress 还简单。下面的安装步骤在 Ubuntu 12.04.4 LTS Server 版本上测试通过。

切换到 root 账号升级和更新整个系统:

$ sudo -i

# apt-get update
# apt-get upgrade

安装 Node.js 运行环境:

# apt-get install g++ make python python-software-properties
# add-apt-repository ppa:chris-lea/node.js
# apt-get update
# apt-get install nodejs

下载、解压 Ghost 后安装:

# cd
# wget https://ghost.org/zip/ghost-0.4.1.zip
# unzip ghost-0.4.1.zip -d ghost
# cd ghost
# npm install --production

配置 Ghost 使其监听本机上的所有 IP,修改 ‘127.0.0.1’ 为 ‘0.0.0.0’:

# vi config.js
...
       server: {
            // Host to be passed to node's `net.Server#listen()`
            host: '0.0.0.0',
            // Port to be passed to node's `net.Server#listen()`, for iisnode set this to `process.env.PORT`
            port: '2368'
        }
...

使用 npm 启动 Ghost 程序:

# npm start

> ghost@0.4.1 start /root/ghost
> node index

Ghost is running in development...
Listening on 0.0.0.0:2368
Url configured as: http://my-ghost-blog.com

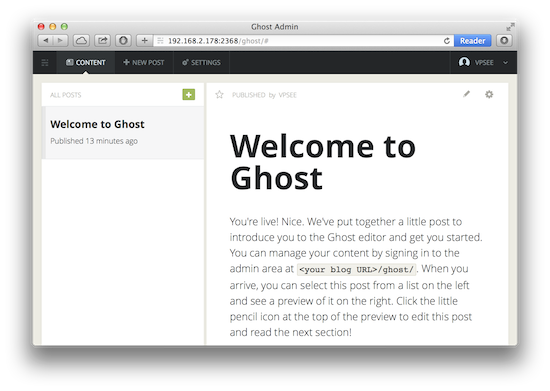
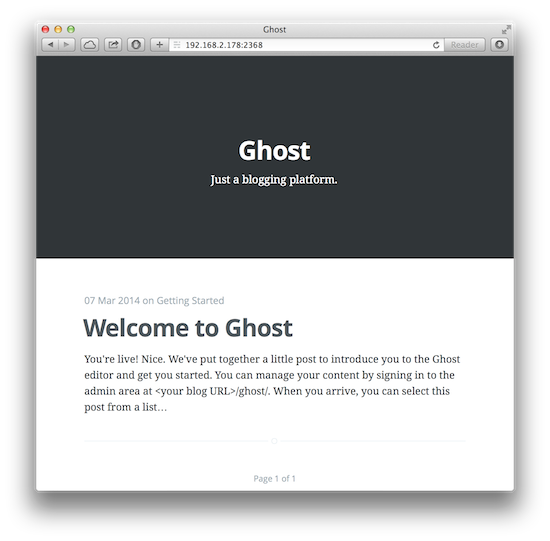
Ghost 的默认端口是 2368,打开浏览器访问 http://192.168.2.178:2368 就可以看到界面了:

Ghost

登录后台访问 http://192.168.2.178:2368/admin 地址:

Ghost

Ghost 是独立程序,在 nodejs 环境下可以直接运行,在 config.js 文件里修改 Ghost 的监听端口 2366 为 80 就可以了,不过在生产环境我们一般在前端加个 Nginx.

安装和配置 Nginx:

# apt-get install nginx
# rm /etc/nginx/sites-enabled/default

# vi /etc/nginx/sites-available/ghost
server {
    listen 0.0.0.0:80;
    server_name vpsee.com;
    access_log /var/log/nginx/vpsee.com.log;

    location / {
        proxy_set_header X-Real-IP $remote_addr;
        proxy_set_header HOST $http_host;
        proxy_set_header X-NginX-Proxy true;

        proxy_pass http://127.0.0.1:2368;
        proxy_redirect off;
    }
}

# ln -s /etc/nginx/sites-available/ghost /etc/nginx/sites-enabled/ghost

# /etc/init.d/nginx restart

Nginx 接到请求后会 pass 给(proxy_pass)Ghost 服务程序,这时候最好把刚才测试用的 Ghost 配置修改还原成 ‘127.0.0.1’,修改后记得重启 Ghost:

# vi config.js
...
            // Host to be passed to node's `net.Server#listen()`
            host: '127.0.0.1',
...

每次 npm start 太麻烦,为了 Ghost 程序在系统启动后能自动运行,需要加入脚本到 Upstart 里:

# vi /etc/init/ghost.conf
start on startup

script
    cd /root/ghost
    npm start
end script

以后需要启动、重启或者停止 Ghost 就可以用 service ghost start/restart/stop 了:

# service ghost restart
ghost stop/waiting
ghost start/running, process 11619

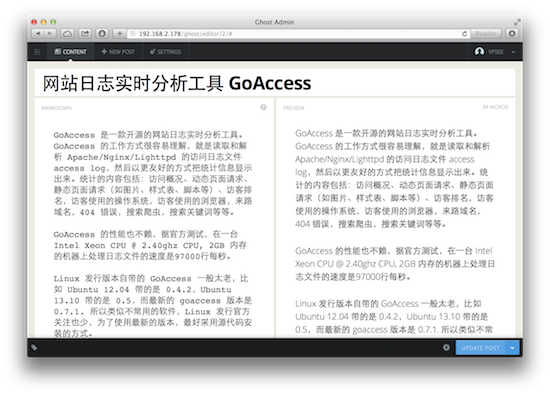
相比 WordPress 的臃肿 Ghost 要轻爽得多。通过 Markdown 格式、Node.js 的实时和漂亮的界面,Ghost 给用户提供了一种更简单、更纯粹的内容写作发布方式。左边是编辑文章,右边是实时预览:

Ghost

网站日志实时分析工具 GoAccess

GoAccess 是一款开源的网站日志实时分析工具。GoAccess 的工作方式很容易理解,就是读取和解析 Apache/Nginx/Lighttpd 的访问日志文件 access log,然后以更友好的方式把统计信息显示出来。统计的内容包括:访问概况、动态页面请求、静态页面请求(如图片、样式表、脚本等)、访客排名,访客使用的操作系统,访客使用的浏览器,来路域名,404 错误,搜索爬虫,搜索关键词等等。

GoAccess 的性能也不赖,据官方测试,在一台 Intel Xeon CPU @ 2.40ghz CPU, 2GB 内存的机器上处理日志文件的速度是97000行每秒。

Linux 发行版本自带的 GoAccess 一般太老,比如 Ubuntu 12.04 带的是 0.4.2,Ubuntu 13.10 带的是 0.5,而最新的 goaccess 版本是 0.7.1. 所以类似不常用的软件,Linux 发行官方关注也少,为了使用最新的版本,最好采用源代码安装的方式。

在 CentOS 6.5 上安装编译 GoAccess 时需要的工具和库:

# yum groupinstall 'Development Tools'
# yum install glib2 glib2-devel ncurses-devel

在 Ubuntu 12.04 上安装编译 GoAccess 时需要的工具和库:

$ sudo apt-get install build-essential
$ sudo apt-get install libglib2.0-dev libncursesw5-dev

下载 GoAccess 的源代码、编译和安装:

$ wget http://downloads.sourceforge.net/project/goaccess/0.7.1/goaccess-0.7.1.tar.gz
$ tar -xzvf goaccess-0.7.1.tar.gz
$ cd goaccess-0.7.1/
$ ./configure --enable-utf8
$ make
$ sudo make install

运行 GoAccess,选择 NCSA Combined Log Format:

$ /usr/local/bin/goaccess -f /var/log/apache2/access.log


                  +--------------------------------------------------+
                  | Log Format Configuration                         |
                  | [SPACE] to toggle - [ENTER] to proceed           |
                  |                                                  |
                  | [ ] Common Log Format (CLF)                      |
                  | [ ] Common Log Format (CLF) with Virtual Host    |
                  | [x] NCSA Combined Log Format                     |
                  | [ ] NCSA Combined Log Format with Virtual Host   |
                  | [ ] W3C                                          |
                  | [ ] CloudFront (Download Distribution)           |
                  |                                                  |
                  | Log Format - [c] to add/edit format              |
                  | %h %^[%d:%^] "%r" %s %b "%R" "%u"                |
                  |                                                  |
                  | Date Format - [d] to add/edit format             |
                  | %d/%b/%Y                                         |
                  +--------------------------------------------------+

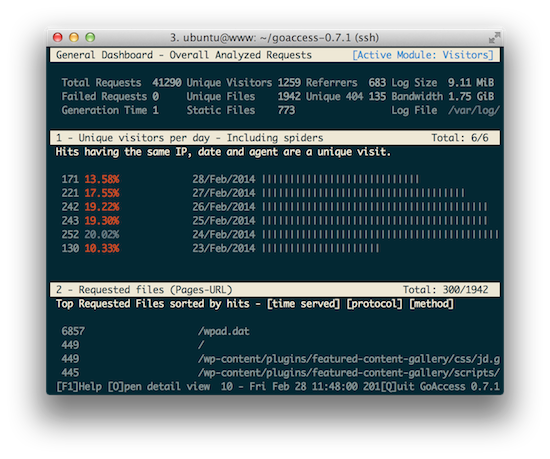
界面如下:

GoAccess

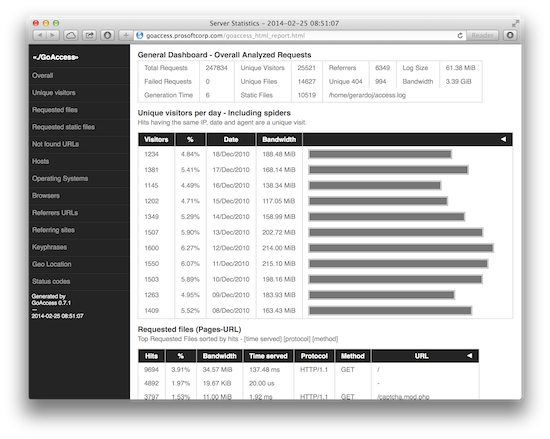
GoAccess 还可以生成 HTML 格式的报告

$ /usr/local/bin/goaccess -f /var/log/apache2/access.log -a > report.html

GoAccess

几个 Nginx 子目录 rewrite 的例子

我们已经有很多客户在 VPS 上使用 Nginx,对于刚从 Apache 转过来的客户最常遇到的一个问题就是怎么弄 Nginx 下的 rewrite 以及怎么把 Apache 里的 .htaccess 转化成 Nginx,网上关于这方面的资料一大堆,关于 wordpress, discuz, phpcms, ecshop, shopex 等的 rewrite 应有尽有,直接 copy 就可以。还有一个 Nginx 新手常见的问题是拿到这些 rewrite 规则后不知道怎么改,比如 Nginx 下子目录的 rewrite 应该改成什么样子?/ 下是 wordpress,/bbs 下装个 discuz,/ 是 discuz,/blog 下装个 wordpress 或者 / 下是 wordpress,/blog 下再装个 wordpress 等,这样的 rewrite 怎么改呢?弄几个例子放到我们的 FAQ 里供参考:

WordPress 安装在子目录 /blog 下:

location /blog/ {
    root   /home/www/vpsee.com;
    index  index.php index.html index.htm;
    if (!-e $request_filename) {
       rewrite ^.+/?(/blog/wp-.*) $1 last;
       rewrite ^.+/?(/blog/.*\.php)$ $1 last;
       rewrite ^(.+)$ /blog/index.php?q=$1 last;
    }
}

Discuz! 7.2 安装在子目录 /bbs 下:

location /bbs/ {
    root   /home/www/vpsee.com;
    index  index.php index.html index.htm;
    rewrite ^/bbs/archiver/((fid|tid)-[\w\-]+\.html)$ /bbs/archiver/index.php?$1 last;
    rewrite ^/bbs/forum-([0-9]+)-([0-9]+)\.html$ /bbs/forumdisplay.php?fid=$1&page=$2 last;
    rewrite ^/bbs/thread-([0-9]+)-([0-9]+)-([0-9]+)\.html$ /bbs/viewthread.php?tid=$1&extra=page%3D$3&page=$2 last;
    rewrite ^/bbs/space-(username|uid)-(.+)\.html$ /bbs/space.php?$1=$2 last;
    rewrite ^/bbs/tag-(.+)\.html$ /bbs/tag.php?name=$1 last;
}

Discuz! X1.5 安装在子目录 /bbs 下:

location /bbs/ {
    root   /home/www/vpsee.com;
    index  index.php index.html index.htm;
    rewrite ^([^\.]*)/topic-(.+)\.html$ $1/portal.php?mod=topic&topic=$2 last;
    rewrite ^([^\.]*)/article-([0-9]+)-([0-9]+)\.html$ $1/portal.php?mod=view&aid=$2&page=$3 last;
    rewrite ^([^\.]*)/forum-(\w+)-([0-9]+)\.html$ $1/forum.php?mod=forumdisplay&fid=$2&page=$3 last;
    rewrite ^([^\.]*)/thread-([0-9]+)-([0-9]+)-([0-9]+)\.html$ $1/forum.php?mod=viewthread&tid=$2&extra=page%3D$4&page=$3 last;
    rewrite ^([^\.]*)/group-([0-9]+)-([0-9]+)\.html$ $1/forum.php?mod=group&fid=$2&page=$3 last;
    rewrite ^([^\.]*)/space-(username|uid)-(.+)\.html$ $1/home.php?mod=space&$2=$3 last;
    rewrite ^([^\.]*)/([a-z]+)-(.+)\.html$ $1/$2.php?rewrite=$3 last;
    if (!-e $request_filename) {
        return 404;
    }
}

如果对理解 ^([^\.]*)/([a-z]+)-(.+)\.html$ 这样的正则表达式有困难并对这方面有兴趣的话可以看看一些书,最好的一本应该是 O’Reilly 出的 Mastering Regular Expressions(也有中文版:《精通正则表达式》)。

使用 Nginx 和 GeoIP 模块来处理不同国家的访问

如果想屏蔽某个地区的 IP 访问的话,用 iptables 把来自某个国家的 IP 重定向到预定页面不是特别灵活的办法,如果只有一个 IP 可用而有多个网站在同一 VPS 上怎么办?用 iptable 屏蔽某个网站的话也会屏蔽同一 VPS 上的其他网站的访问。所以正统的办法还是用 GeoIP 配合对应的 web 服务器模块,比如:apache + mod_geoip 或者 nginx + http_geoip_module 等。

安装 Nginx

因为要用到 http_geoip_module 模块,系统自带的 nginx 一般不带这个模块,所以要下载 nginx 源代码后自行编译:

# wget http://nginx.org/download/nginx-0.9.6.tar.gz
# tar zxvf nginx-0.9.6.tar.gz
# cd nginx-0.9.6
# ./configure --without-http_empty_gif_module --with-poll_module \
--with-http_stub_status_module --with-http_ssl_module \
--with-http_geoip_module
# make; make install

安装 MaxMind 的 GeoIP 库

MaxMind 提供了免费的 IP 地域数据库(GeoIP.dat),不过这个数据库文件是二进制的,需要用 GeoIP 库来读取,所以除了要下载 GeoIP.dat 文件外(见下一步),还需要安装能读取这个文件的库。

# wget http://geolite.maxmind.com/download/geoip/api/c/GeoIP.tar.gz
# tar -zxvf GeoIP.tar.gz
# cd GeoIP-1.4.6
# ./configure
# make; make install

刚才安装的库自动安装到 /usr/local/lib 下,所以这个目录需要加到动态链接配置里面以便运行相关程序的时候能自动绑定到这个 GeoIP 库:

# echo '/usr/local/lib' > /etc/ld.so.conf.d/geoip.conf
# ldconfig

下载 IP 数据库

MaxMind 提供了免费的 IP 地域数据库,这个数据库是二进制的,不能用文本编辑器打开,需要上面的 GeoIP 库来读取:

# wget http://geolite.maxmind.com/download/geoip/database/GeoLiteCountry/GeoIP.dat.gz
# gunzip GeoIP.dat.gz

配置 Nginx

最后是配置 nginx,在相关地方加上如下的配置就可以了:

# vi /etc/nginx/nginx.conf

http {
...
geoip_country /home/vpsee/GeoIP.dat;
fastcgi_param GEOIP_COUNTRY_CODE $geoip_country_code;
fastcgi_param GEOIP_COUNTRY_CODE3 $geoip_country_code3;
fastcgi_param GEOIP_COUNTRY_NAME $geoip_country_name;
...
}

server {
...
        location / {
            root   /home/vpsee/www;
            if ($geoip_country_code = CN) {
                root /home/vpsee/cn;
            }
            ...
        }
...
}

这样,当来自中国的 IP 访问网站后就自动访问到预定的 /home/vpsee/cn 页面。关于 Nginx + GeoIP 还有很多有用的用法,比如做个简单的 CDN,来自中国的访问自动解析到国内服务器、来自美国的访问自动转向到美国服务器等。MaxMind 还提供了全球各个城市的 IP 信息,还可以下载城市 IP 数据库来针对不同城市做处理。

Nginx 使用 Linux-native aio 需要 Linux 内核支持

Nginx 性能优异在于善于利用操作系统内核的各种特性,比如 aio/epoll/sendfile (Linux), kqueue (FreeBSD) 等。对于使用 VPS 做图片站的站长来说,使用 nginx 的 aio 特性会大大提高性能,图片站的特点是大量的读 io 操作,nginx aio 不用等待每次 io 的结果有助于并发处理大量 io 和提高 nginx 处理效率。

前段时间有位客户要用 nginx aio,他用 rpm 升级安装 nginx 到 0.8.5 版本时候发现 rpm 包里的 nginx 没有包含 Linux-native aio (asynchronous I/O) 的支持,所以需要下载 nginx 源代码并带上参数 –with-file-aio 编译。除了要带参数外,Linux 内核还必须有支持这一特性的 api,eventfd(),否则在 nginx 错误日志(/var/log/nginx/error.log)里会看到类似的报错:

eventfd() failed (38: Function not implemented)
worker process 1858 exited with fatal code 2 and can not be respawn

要让 nginx 使用 aio 特性还需要修改 nginx 配置文件:

# vi /etc/nginx/nginx.conf
...
location / {
aio on;
directio 1;
output_buffers 1 128k;
}
...

昨天另一客户遇到 nginx 启动配置都正确却无法看到网页的情况,VPSee 刚开始怀疑是他自己的 nginx 配置有误或者防火墙屏蔽了80端口,后来登录到他的 VPS 上发现 nginx 配置的确没问题,能正常启动,可以 telnet 80 端口,但是不能 get 到网页。打开 nginx 日志也发现 eventfd() failed 的错误提示。后来检查他的 Linux VPS 内核版本是 2.6.18,查了一下 man 帮助发现只有 2.6.22 以后版本才支持 eventfd,解决方法很简单,升级内核就可以了。

Linux-native aio 比传统的 POSIX aio 功能更丰富一些,重要的一点是能通过内核加速提供高性能。直接用 Linux-native aio API 比较晦涩,为了方便使用和开发 Linux-native aio 应用程序我们可以用 libaio/libaio-devel 库。不过 nginx 的作者没有用这些库,因为 nginx 需要 eventfd(),而 libaio 库里只有 0.3.107 版本起才支持 eventfd;nginx 也没有用 glibc,因为 glibc 要到 2.8 版本才支持 eventfd(),为了减少对库的依赖性,nginx 干脆直接用 Linux-native aio API (system calls).

$ vi nginx-0.9.1/src/event/modules/ngx_epoll_module.c
...
#if (NGX_HAVE_FILE_AIO)

/*
 * We call io_setup(), io_destroy() io_submit(), and io_getevents() directly
 * as syscalls instead of libaio usage, because the library header file
 * supports eventfd() since 0.3.107 version only.
 *
 * Also we do not use eventfd() in glibc, because glibc supports it
 * since 2.8 version and glibc maps two syscalls eventfd() and eventfd2()
 * into single eventfd() function with different number of parameters.
 */
...

这里说到了 eventfd(),eventfd 是 Linux-native aio 其中的一个 API,用来生成 file descriptors,这些 file descriptors 可为应用程序提供更高效 “等待/通知” 的事件机制。和 pipe 作用相似,但比 pipe 更好,一方面它只用到一个 file descriptor(pipe 要用两个),节省了内核资源;另一方面,eventfd 的缓冲区管理要简单得多,pipe 需要不定长的缓冲区,而 eventfd 全部缓冲只有定长 8 bytes.

在 Debian 上源码编译和安装 Nginx+PHP+FastCGI+MySQL

前天有一位新客户购买我们的 VPS 后多次在上面源码编译和安装 Nginx+PHP+FastCGI+MySQL 不成功,遇到一些问题,总的来说分为两类,一个是包依赖问题,一个是 MySQL 目录的权限设置问题。昨天这位客户给我们发来一个论坛链接很细致的描述了他的安装过程和遇到的问题,可惜后面回帖的人都没说到重点,还有一位回帖人居然是我们的客户,呵呵,世界好小。VPSee 决定花点时间写个教程,可能对其他的 Linux/VPS 用户也有帮助。我们的 VPS 和那些使用 SolusVM 控制面板和模版的 VPS 服务商不同,我们自己制作 VPS 模版,采用最小化安装,不添加任何乱七八糟的东西,保持最简和干净,所以 VPS 上只装有必备的软件包和库,在编译 Nginx+PHP+FastCGI+MySQL 之前必须先安装一些编译时需要的软件包和库。

记得以前有位客户问过为什么我们的 VPS 上连基本的 gcc 工具都没有?为什么我们采用最小化安装?为什么我们没有提供那些都安装好的模版?有3个原因,1、不需要 gcc Linux 也可以运行,所以 gcc 不是必须的,这满足我们最小化的要求;2、安全,如果有人得到 Linux 普通用户帐号可以下载、通过 gcc 编译和运行一些后门代码以得到 root 权限或者干坏事,所以不是必要的话不推荐安装 gcc 等编译工具,同样的道理也适用我们对其他工具的要求;3、定制,每个人的要求是不同的,有的人喜欢 nginx,有的人喜欢 apache,所以我们采用最小化安装,把选择留给客户。我们认为最小化可以带来简单、安全和灵活。

下面的操作步骤在我们的 256MB Debian 5.0 VPS 上测试通过,Nginx/PHP/MySQL 都采用当前最新稳定源代码版本。

安装必备软件包

# aptitude install libtidy-dev curl libcurl4-openssl-dev libcurl3 \
libcurl3-gnutls zlib1g zlib1g-dev libxslt1-dev libzip-dev libzip1 \
libxml2 libsnmp-base libsnmp15 libxml2-dev libsnmp-dev libjpeg62 \
libjpeg62-dev libpng12-0 libpng12-dev zlib1g zlib1g-dev libfreetype6 \
libfreetype6-dev libbz2-dev libxpm-dev libmcrypt-dev libmcrypt4 \
sqlite3 bzip2 build-essential libreadline5-dev libedit-dev autoconf

编译和安装 MySQL

下载和编译 MySQL,但是先不要安装:

# wget http://mysql.mirror.rafal.ca/Downloads/MySQL-5.1/mysql-5.1.50.tar.gz
# tar zxvf mysql-5.1.50.tar.gz
# cd mysql-5.1.50

# ./configure \
 --prefix="/usr/local/mysql-5.1.50" \
 --enable-thread-safe-client \
 --with-extra-charsets=all
# make

需要改几个权限问题才能安装 MySQL,否则会出现 Access denied for user ‘root’@’localhost’ (using password: NO) 经典问题:

# groupadd mysql 
# useradd -g mysql mysql

# cp support-files/my-small.cnf /etc/my.cnf
# vi /etc/my.conf
...
[mysqld]
user = mysql 
...

# chown -R mysql:mysql /usr/local/mysql-5.1.50/
# chmod 777 /tmp

安装和启动 MySQl,修改 root 密码,登录 MySQL:

# cd mysql-5.1.50
# make install

# /usr/local/mysql-5.1.50/bin/mysql_install_db --user=mysql
# /usr/local/mysql-5.1.50/bin/mysqld_safe &
# /usr/local/mysql-5.1.50/bin/mysqladmin -u root password 'new-password'
# /usr/local/mysql-5.1.50/bin/mysql -u root -p

编译和安装 PHP

先下载 PHP 软件包,然后配置、编译,这里采用 php 5.2 分支的最新稳定代码:

# wget http://www.php.net/get/php-5.2.13.tar.bz2/from/us.php.net/mirror
# tar jxvf php-5.2.13.tar.bz2
# cd php-5.2.13

# ./configure \
 --prefix="/usr/local/php-5.2.13" \
 --with-mysql="/usr/local/mysql-5.1.50" \
 --with-gd \
 --with-ttf \
 --with-openssl \
 --enable-mbstring \
 --enable-fastcgi
# make && make install

编译和安装 Nginx

下载、配置和编译安装 nginx,注意编译 nginx 需要额外安装几个软件包:

# wget http://nginx.org/download/nginx-0.7.67.tar.gz
# tar zxvf nginx-0.7.67.tar.gz

# aptitude install libgcrypt11-dev libpcre3 libpcre3-dev libssl-dev

# cd nginx-0.7.67
# ./configure  --prefix="/usr/local/nginx-0.7.67"  --with-http_ssl_module
# make && make install

编译和安装 FastCGI

Nginx 需要 FastCGI 的支持才能运行 PHP 脚本,从 lighttpd 下载、编译和安装 spawn-fcgi:

# wget http://www.lighttpd.net/download/spawn-fcgi-1.6.2.tar.bz2
# tar jxvf spawn-fcgi-1.6.2.tar.bz2

# cd spawn-fcgi-1.6.2
# ./configure --prefix="/usr/local/php-5.2.13"
# make && make install

启动 FastCGI:

# /usr/local/php-5.2.13/bin/spawn-fcgi -a 127.0.0.1 -p 9000 \
-u www-data -g www-data -f /usr/local/php-5.2.13/bin/php-cgi \
-P /var/run/fastcgi-php.pid

编辑 Nginx 的配置文件,让 php 脚本被发送到 FastCGI 服务器由 FastCGI 处理,然后启动 nginx:

# vi /usr/local/nginx-0.7.67/conf/nginx.conf
...
        # fix nginx/php/fastcgi important security issue
        # http://cnedelcu.blogspot.com/2010/05/nginx-php-via-fastcgi-important.html
        location ~ \..*/.*\.php$ {
            return 403;
        }

        # pass the PHP scripts to FastCGI server listening on 127.0.0.1:9000
        location ~ \.php$ {
            #root           html;
            root           /usr/local/nginx-0.7.67/html;
            fastcgi_pass   127.0.0.1:9000;
            fastcgi_index  index.php;
            fastcgi_param  SCRIPT_FILENAME  /usr/local/nginx-0.7.67/html$fastcgi_script_name;
            include        fastcgi_params;
        }
...

# /usr/local/nginx-0.7.67/sbin/nginx -c /usr/local/nginx-0.7.67/conf/nginx.conf

安装 Nginx+FastCGI+PHP 完后测试一下是否 PHP 页面能否被正确解析,在 html 下创建一个含有 phpinfo(); 函数的文件,最后打开浏览器检查下面的 index.php 能否被正确执行。:

# vi /usr/local/nginx-0.7.67/html/index.php
phpinfo();

编译源代码需要消耗大量内存,我们只建议 256MB 或以上 VPS 用户使用源码方式安装。

NetBSD 上安装和配置 Nginx+PHP+FastCGI+MySQL

NetBSD 支持 n 种硬件架构,是地球上支持最多体系的系统;OpenBSD 来自 NetBSD,自称是地球上最安全的系统;FreeBSD 和 NetBSD 一样来自原始的 4.4 BSD-lite,但是 FreeBSD 现在主要支持 i386,在 PC 体系上 FreeBSD 比 NetBSD/OpenBSD 好很多,性能也最好。这三种 BSD 各有特点,和不同的 Linux 发行版一样每个系统都有很多粉丝,当然使用 FreeBSD 的人最多。VPSee 的一台老掉牙的 IBM ThinkPad 就在跑 FreeBSD,嗯,现在这台机器还在工作呢。虽然 NetBSD 的性能在 i386 上没有 FreeBSD 那么好,但是它的稳定性是非常的赞,Benchmarking BSD and Linux 这篇测试的作者说:

Please note that NetBSD was the only BSD that never crashed or panicked on me, so it gets favourable treatment for that.

我们上周五发布了 NetBSD VPS,我们鼓励用户自己动手安装 Nginx+PHP+FastCGI+MySQL 和熟悉 NetBSD 环境,这篇文章在我们的 NetBSD VPS 上搭建:

下载 pkgsrc

The NetBSD Packages Collection (pkgsrc) 是 NetBSD 下的基于源码的软件包管理系统,不同于 Debian/Ubuntu 上的 apt-get,pkgsrc 是基于源代码的方式管理软件包的,有点像 Gentoo 里面的 emerge 系统。pkgsrc 有三个分支,HEAD、pkgsrc-yyyyQqq 和 pkgsrc-wip,前两个是 pkgsrc 项目组的正式分支。我们在这里使用 pkgsrc-yyyyQqq(季度分支),下载和解压 pkgsrc 并放到合适的目录:

# ftp ftp://ftp.NetBSD.org/pub/pkgsrc/pkgsrc-2010Q2/pkgsrc-2010Q2.tar.bz2
# tar jxvf pkgsrc-2010Q2.tar.bz2
# mv pkgsrc /usr/

安装 Nginx+PHP+FastCGI+MySQL

编译和安装 PHP,注意编译 PHP 的时候需要加上 fastcgi 说明,这样 PHP 编译才会把 FastCGI 部分编译进去:

# vi /etc/mk.conf
PKG_OPTIONS.php = fastcgi

# cd /usr/pkgsrc/lang/php5
# make install clean clean-depends

配置 PHP:

# /usr/pkg/etc/php.ini
cgi.fix_pathinfo=1

编译和安装 FastCGI:

# cd /usr/pkgsrc/www/spawn-fcgi/
# make install clean clean-depends

编译和安装 Nginx:

# cd /usr/pkgsrc/www/nginx
# make install clean clean-depends

配置 Nginx:

# cp /usr/pkg/share/examples/rc.d/nginx /etc/rc.d/
# vi /usr/pkg/etc/nginx/nginx.conf
location / {
            root   share/examples/nginx/html;
            index  index.html index.htm index.php;
        }

...

location ~ \.php$ {
            root           html;
            fastcgi_pass   127.0.0.1:9000;
            fastcgi_index  index.php;
            fastcgi_param  SCRIPT_FILENAME  /usr/pkg/share/examples/nginx/html$f
astcgi_script_name;
            include        /usr/pkg/etc/nginx/fastcgi_params;
        }

把 Nginx 加到启动文件以便启动系统时自动启动:

# vi /etc/rc.conf 
nginx=YES

编译和安装 MySQL:

# cd /usr/pkgsrc/databases/php-mysql
# make install clean clean-depends

# cd /usr/pkgsrc/databases/mysql5-server
# make install clean clean-depends

配置 PHP 以便加载 MySQL 动态连接库:

# vi /usr/pkg/etc/php.ini
extension=mysql.so

把 MySQL 加到启动文件以便启动系统时自动启动:

# cp /usr/pkg/share/examples/rc.d/mysqld /etc/rc.d/

# vi /etc/rc.conf 
mysqld=YES

启动 FastCGI:

# /usr/pkg/bin/spawn-fcgi -a 127.0.0.1 -p 9000 -f /usr/pkg/libexec/cgi-bin/php
spawn-fcgi: child spawned successfully: PID: 18554

启动 Nginx:

# /etc/rc.d/nginx start
Starting nginx.

启动 MySQL 和设置 root 密码:

# /etc/rc.d/mysqld start

# /usr/pkg/bin/mysqladmin -u root -p password 'new-password'

测试

写一个 phpinfo() 文件放在 nginx 目录下,然后打开浏览器测试是否能正确访问 php 文件:

# vi /usr/pkg/share/examples/nginx/html/index.php


http://www.vpsee.com/index.php

CentOS 5 上部署 Nginx、Mongrel 和 Rails

接着昨天的来,昨天 VPSee 简单的安装和试用了一下 Redmine,发现 Redmine 的界面很简单清新、使用也很方便,需要的功能都有。今天打算部署到稍微专业一点的环境,Ruby on Rails 的部署方案主要有以下几种:

  • Lighttpd + FastCGI
  • Nginx + Mongrel
  • Nginx + Thin
  • Nginx + Phusion Passenger
  • Apache2 + Thin
  • Apache2 + Phusion Passenger (Mod_Rails)

目前用的比较多、比较成熟的要算 Nginx + Mongrel 和 Apache2 + Passenger 了,Apache2 + Passenger 配置很简单,非常适合多 ruby app 的部署。考虑到成熟、稳定、而且 VPSee 对 Nginx 比较熟悉,所以选定 Nginx + Mongrel 组合作为 Redmine 环境的部署方案。以下的内容虽然以 Redmine 为例来描述如何部署 Nginx + Mongrel,其配置方法也适用与一般 Rails 程序部署的情况。

安装和配置 Ruby on Rails

详细参考 “CentOS 5 上配置 Redmine 和 Git” 中的 “安装必要的软件包” 和 “安装和配置 Ruby on Rails”.

安装和配置 Mongrel

拷贝 mongrel_cluster 启动文件到 /etc/init.d/,在 /etc 下创建一个目录 mongrel_cluster 用来存放 mongrel 程序的配置文件,配置文件必须以 yml 扩展名结尾,不能是 yaml,最后修改 yml 配置文件,注意 user/group 要和前面一文的对上,否则 mongrel_cluster 启动不了:

# gem install mongrel
# gem install mongrel_cluster

# cp /usr/local/lib/ruby/gems/1.8/gems/mongrel_cluster-1.0.5/resources \
/mongrel_cluster /etc/init.d/
# chmod +x /etc/init.d/mongrel_cluster
# /sbin/chkconfig --level 345 mongrel_cluster on

# mkdir /etc/mongrel_cluster
cp /usr/local/lib/ruby/gems/1.8/gems/mongrel_cluster-1.0.5/resources/defaults.yaml /etc/mongrel_cluster/redmine.yml

# vi /etc/mongrel_cluster/redmine.yml
---
cwd: /home/redmine/
port: "9000"
environment: production
address: 127.0.0.1
pid_file: log/mongrel.pid
servers: 4
group: redmine
user: redmine

启动 mongrel:

# /etc/init.d/mongrel_cluster start

安装配置 Nginx

安装完 nginx 后需要修改配置文件,nginx 支持模块化配置,为了更清晰最好把全局配置文件和 virtal host 配置文件分开,先是修改 nginx 的全局配置文件:

# yum install nginx

# vi /etc/nginx/nginx.conf
user              nginx;
worker_processes  1;
error_log         /var/log/nginx/error.log;
pid               /var/run/nginx.pid;

events {
    worker_connections  1024;
}

http {
    include       /etc/nginx/mime.types;
    default_type  application/octet-stream;

    log_format  main  '$remote_addr - $remote_user [$time_local] $request'
                      '"$status" $body_bytes_sent "$http_referer"'
                      '"$http_user_agent" "$http_x_forwarded_for"';

    access_log  /var/log/nginx/access.log  main;

    sendfile        on;
    tcp_nopush      on;
    tcp_nodelay     off;
    keepalive_timeout  65;

    gzip  on;
    gzip_http_version 1.0;
    gzip_comp_level 2;
    gzip_proxied any;
    gzip_types text/plain text/html text/css application/x-javascript 
text/xml application/xml application/xml+rss text/javascript;

    include /etc/nginx/conf.d/*.conf;
    include /etc/nginx/vhosts/*;
}

接着在 /etc/nginx/ 下面创建一个文件夹 vhosts 用来存放多个 virtual host 局部配置文件:

# mkdir /etc/nginx/vhosts
# vi /etc/nginx/vhosts/vpsee.com.conf

upstream mongrel_server {
        server 127.0.0.1:9000;
        server 127.0.0.1:9001;
        server 127.0.0.1:9002;
        server 127.0.0.1:9003;
}

server {
        listen  80;
        server_name  vpsee.com www.vpsee.com;

        client_max_body_size 10M;
        root   /home/redmine;

        access_log  /var/www/access_vpsee.com.log  main;

        location / {
            proxy_set_header X-Real-IP $remote_addr;
            proxy_set_header X-Forwarded-For $proxy_add_x_forwarded_for;
            proxy_set_header Host $http_host;
            proxy_redirect false;
            proxy_max_temp_file_size 0;

            if (-f $request_filename) {
                break;
            }
            if (-f $request_filename/index.html) {
                rewrite (.*) $1/index.html break;
            }
            if (-f $request_filename.html) {
                rewrite (.*) $1.html break;
            }
            if (!-f $request_filename) {
                proxy_pass http://mongrel_server;
                break;
            }
        }

        error_page   500 502 503 504  /50x.html;
        location = /50x.html {
            root   /usr/share/nginx/html;
        }
}

启动 nginx:

# /etc/init.d/nginx start

打开浏览器应该就可以访问了。